Managing Team Availability
Overview
Section titled “Overview”DubPlanner helps you plan realistically by tracking when team members are unavailable or partially allocated to other work. This prevents accidentally assigning work during vacations, holidays, or when team members are committed elsewhere.
Types of Availability
Section titled “Types of Availability”DubPlanner tracks two types of unavailability:
Unavailable (Global)
Section titled “Unavailable (Global)”Team member is completely unavailable across all projects:
- Vacation: Planned time off
- Sick Leave: Unplanned absence
- Holidays: Company or regional holidays
- Training: Out for conferences or training
- Other absences: Jury duty, family leave, etc.
Visual Indicator: Red X icon in the grid cell
Partially Available (Project-Specific)
Section titled “Partially Available (Project-Specific)”Team member is allocated to a different project:
- Working on another project during this time
- Split allocation between multiple projects
- Can include a reason or project name
Visual Indicator: Yellow clock icon in the grid cell
Booking time off from the grid
Section titled “Booking time off from the grid”The fastest route is the cell itself. Right-click a person’s week and open the Availability submenu:
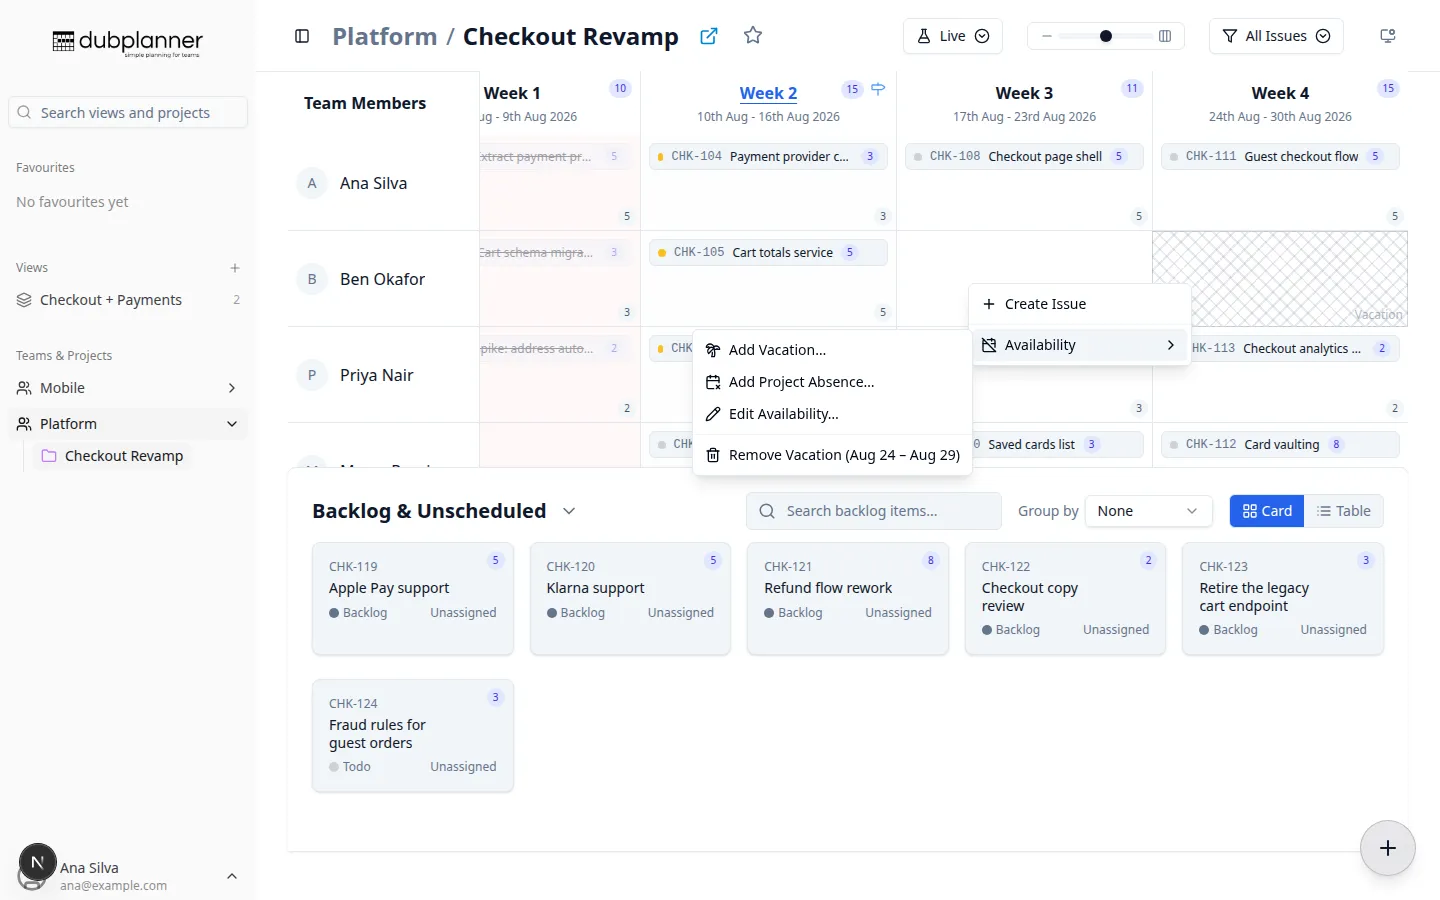
- Add Vacation… — a global absence, for time off
- Add Project Absence… — an absence scoped to this project only. (Not offered in a Custom View, where a cell spans no single project.)
- Edit Availability… — open the full dialog on that person’s entries
- Remove entry — any entry overlapping that week can be removed from right here
Opening the Availability Dialog
Section titled “Opening the Availability Dialog”- Right-click a team member’s name → Manage Availability
- Click a team member’s name
- Availability → Edit Availability… on any of their cells
- Your own availability: the user menu at the bottom of the sidebar
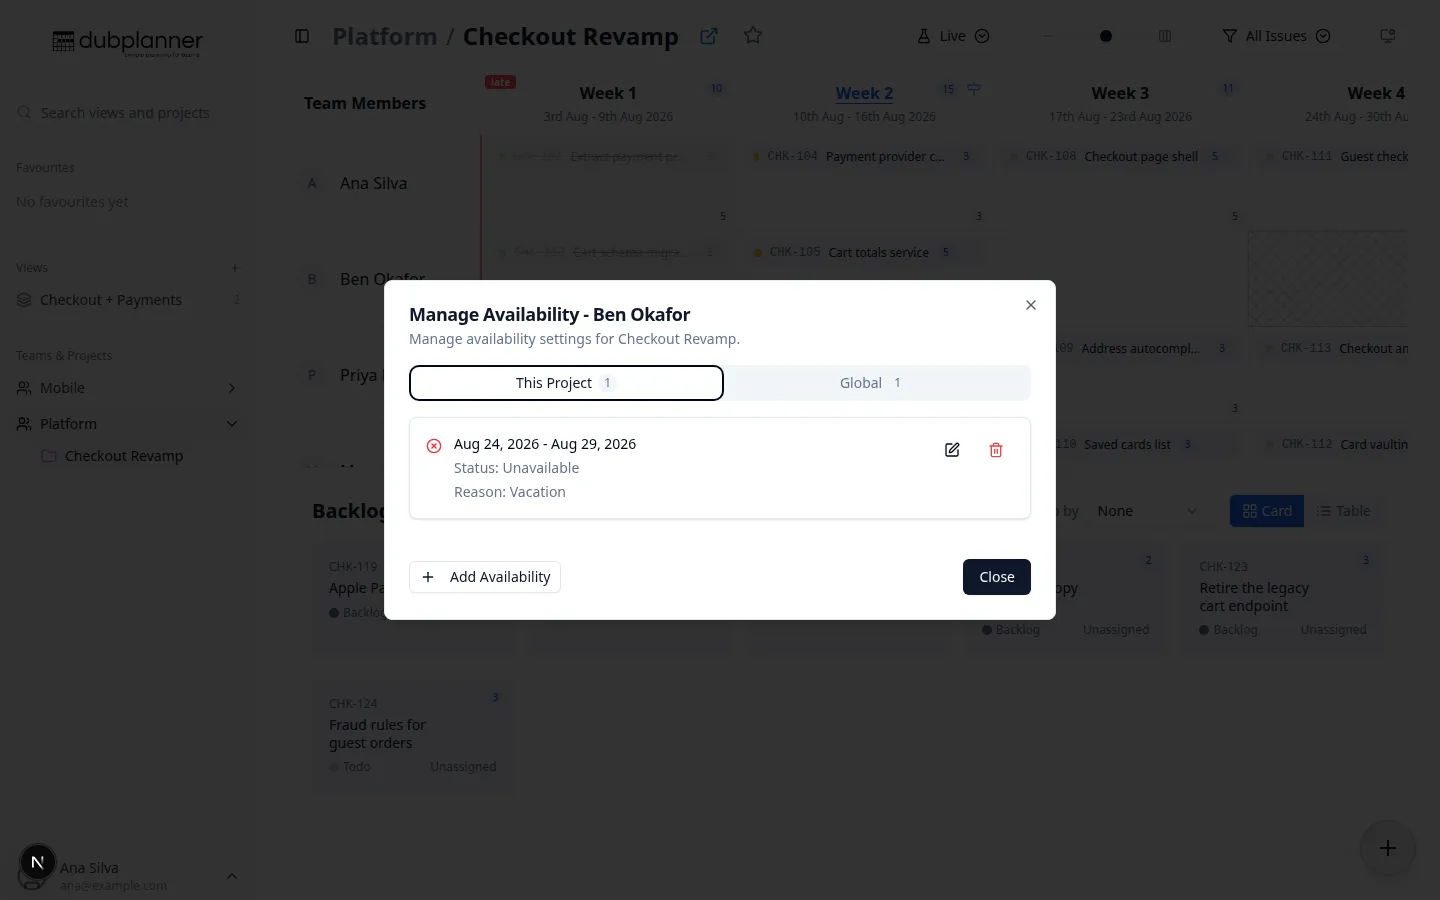
The Availability Dialog
Section titled “The Availability Dialog”Inside a project the dialog has two tabs, each showing how many entries it holds:
This Project
Section titled “This Project”Unavailability for the current project only:
- Partial allocation to other projects
- Project-specific commitments
- Does not affect that person’s other projects
Global
Section titled “Global”Unavailability across all projects:
- Vacation, sick leave, holidays
- Applies everywhere in DubPlanner
- The usual choice for time off
Adding Unavailability
Section titled “Adding Unavailability”Step 1: Choose the Tab
Section titled “Step 1: Choose the Tab”- Use Global for time off (vacation, sick leave)
- Use This Project for allocation to other projects
Step 2: Set the Dates
Section titled “Step 2: Set the Dates”- Start Date: First day of unavailability
- End Date: Last day of unavailability
- Dates are inclusive (includes both start and end days)
Step 3: Choose the Type
Section titled “Step 3: Choose the Type”For Global unavailability:
- Select “Unavailable” (completely out)
For Project unavailability:
- Select “Unavailable” (no capacity for this project)
- Or “Partially Available” (some capacity but not full)
Step 4: Add a Title/Reason (Optional)
Section titled “Step 4: Add a Title/Reason (Optional)”Provide context about the unavailability:
- “Vacation in Hawaii”
- “Allocated to Mobile App project”
- “Training: React Advanced Workshop”
- “Sick leave”
The reason appears when hovering over the unavailability indicator.
Step 5: Save
Section titled “Step 5: Save”Click “Save” or “Add” to create the unavailability period.
Viewing Availability on the Grid
Section titled “Viewing Availability on the Grid”Visual Indicators
Section titled “Visual Indicators”Look for icons in the team member’s row:
- Red X: Completely unavailable
- Yellow Clock: Partially available or allocated elsewhere
- No indicator: Fully available
Hover for Details
Section titled “Hover for Details”Hover your mouse over an unavailability indicator to see:
- The reason or title
- Start and end dates
- Type of unavailability
How Availability Affects Planning
Section titled “How Availability Affects Planning”Drag-and-Drop Validation
Section titled “Drag-and-Drop Validation”When dragging an issue over an unavailable cell:
- Unavailable (Red X): Drop is blocked
- Partially Available (Yellow Clock): Drop is allowed but shows warning
- Visual feedback helps prevent scheduling errors
Visual Warnings
Section titled “Visual Warnings”Cells with unavailability:
- Show the appropriate indicator
- May have a different background color
- Clearly communicate capacity constraints
Editing Availability
Section titled “Editing Availability”To modify an existing unavailability period:
- Open the availability dialog for the team member
- Find the availability entry in the list
- Click the edit icon or the entry itself
- Update the dates, type, or reason
- Save the changes
Deleting Availability
Section titled “Deleting Availability”Either:
- From the grid — right-click a cell in the affected week → Availability → Remove …
- From the dialog — open it for that person, find the entry and use its delete icon
The person becomes fully available for those dates, and the shading disappears from the grid straight away, including when you remove someone’s very last entry.
Common Scenarios
Section titled “Common Scenarios”Scenario 1: Summer Vacation
Section titled “Scenario 1: Summer Vacation”Situation: Team member is on vacation for two weeks.
Solution:
- Right-click team member name → “Manage Availability”
- Go to the Global tab
- Set start and end dates for the vacation
- Type: “Unavailable”
- Reason: “Summer vacation”
- Save
Result: Red X appears in grid cells for those weeks. Issues cannot be assigned.
Scenario 2: Split Between Projects
Section titled “Scenario 2: Split Between Projects”Situation: Team member is 50% on your project, 50% on another project for Q1.
Solution:
- Right-click team member name → “Manage Availability”
- Go to the This Project tab (current project only)
- Set start and end dates for Q1
- Type: “Partially Available”
- Reason: “50% allocated to Mobile App project”
- Save
Result: Yellow clock appears in grid cells. Issues can still be assigned, but the visual reminder helps with capacity planning.
Scenario 3: Company Holiday
Section titled “Scenario 3: Company Holiday”Situation: Office closed for a week-long holiday.
Solution (for each team member):
- Right-click team member name → “Manage Availability”
- Go to the Global tab
- Set dates for the holiday week
- Type: “Unavailable”
- Reason: “Company holiday week”
- Save
Result: Red X for all team members during that week.
Scenario 4: Sick Leave (Unplanned)
Section titled “Scenario 4: Sick Leave (Unplanned)”Situation: Team member calls in sick unexpectedly.
Solution:
- Open availability dialog for that team member
- Add global unavailability for today (or multiple days)
- Type: “Unavailable”
- Reason: “Sick leave”
- Move any issues assigned this week to another team member or week
Result: Issues are rescheduled, and the team member’s absence is documented.
Best Practices
Section titled “Best Practices”Planning Ahead
Section titled “Planning Ahead”- Enter known time off early: Add vacations as soon as they’re approved
- Set up holiday calendars: Add company holidays at the start of the year
- Communicate changes: Let the team know when availability changes
Using Global vs. Project
Section titled “Using Global vs. Project”- Global: Use for any time the person is completely out (vacation, sick, holidays)
- Project: Use when they’re working but on a different project
- Partially Available: Use for split allocations where some work is possible
Capacity Planning
Section titled “Capacity Planning”- Check before assigning: Review availability before dragging issues onto the grid
- Balance workload: Redistribute work from unavailable team members
- Plan buffer: Don’t fully load weeks adjacent to time off
Keeping It Updated
Section titled “Keeping It Updated”- Remove past unavailability: Clean up old entries periodically
- Update as plans change: Adjust dates when vacation plans shift
- Track sick leave: Document unplanned absences for retrospectives
Integration with Linear
Section titled “Integration with Linear”Availability information is stored in DubPlanner only:
- Not synced to Linear
- Specific to DubPlanner’s planning functionality
- Persists across sessions and users
However, the effects are visible in Linear:
- Issues won’t be assigned to unavailable team members for those weeks
- Week labels reflect the adjusted schedule
Multi-User Coordination
Section titled “Multi-User Coordination”When multiple people manage availability:
- Real-time updates: Changes appear immediately for all users
- Collaboration: Anyone can add or update availability
- Transparency: Everyone sees the same availability information
- Conflict prevention: Helps avoid double-booking team members
Reporting and Visibility
Section titled “Reporting and Visibility”Currently, availability is visible:
- On the planning grid with visual indicators
- In the availability dialog with the full list
- On hover tooltips with details
Troubleshooting
Section titled “Troubleshooting”Can’t Add Availability
Section titled “Can’t Add Availability”- Check permissions: Verify you have edit access to the project
- Verify dates: Ensure end date is after start date
- Try refreshing: Reload the page if the dialog seems stuck
Availability Not Showing
Section titled “Availability Not Showing”- Check the correct tab: Global vs. Project tabs show different availability
- Verify date range: Ensure the unavailability covers the weeks you’re viewing
- Refresh the page: Sometimes a refresh is needed to see updates
Can Still Drop on Unavailable Cell
Section titled “Can Still Drop on Unavailable Cell”- Partially available: Yellow clock cells accept drops (by design)
- Check the indicator: Red X blocks drops, yellow clock allows with warning
Deleted Team Member
Section titled “Deleted Team Member”If a team member leaves the company:
- Their availability entries remain in the system
- Issues assigned to them stay assigned (until reassigned)
- Consider reassigning their work before they leave