The Planner Grid
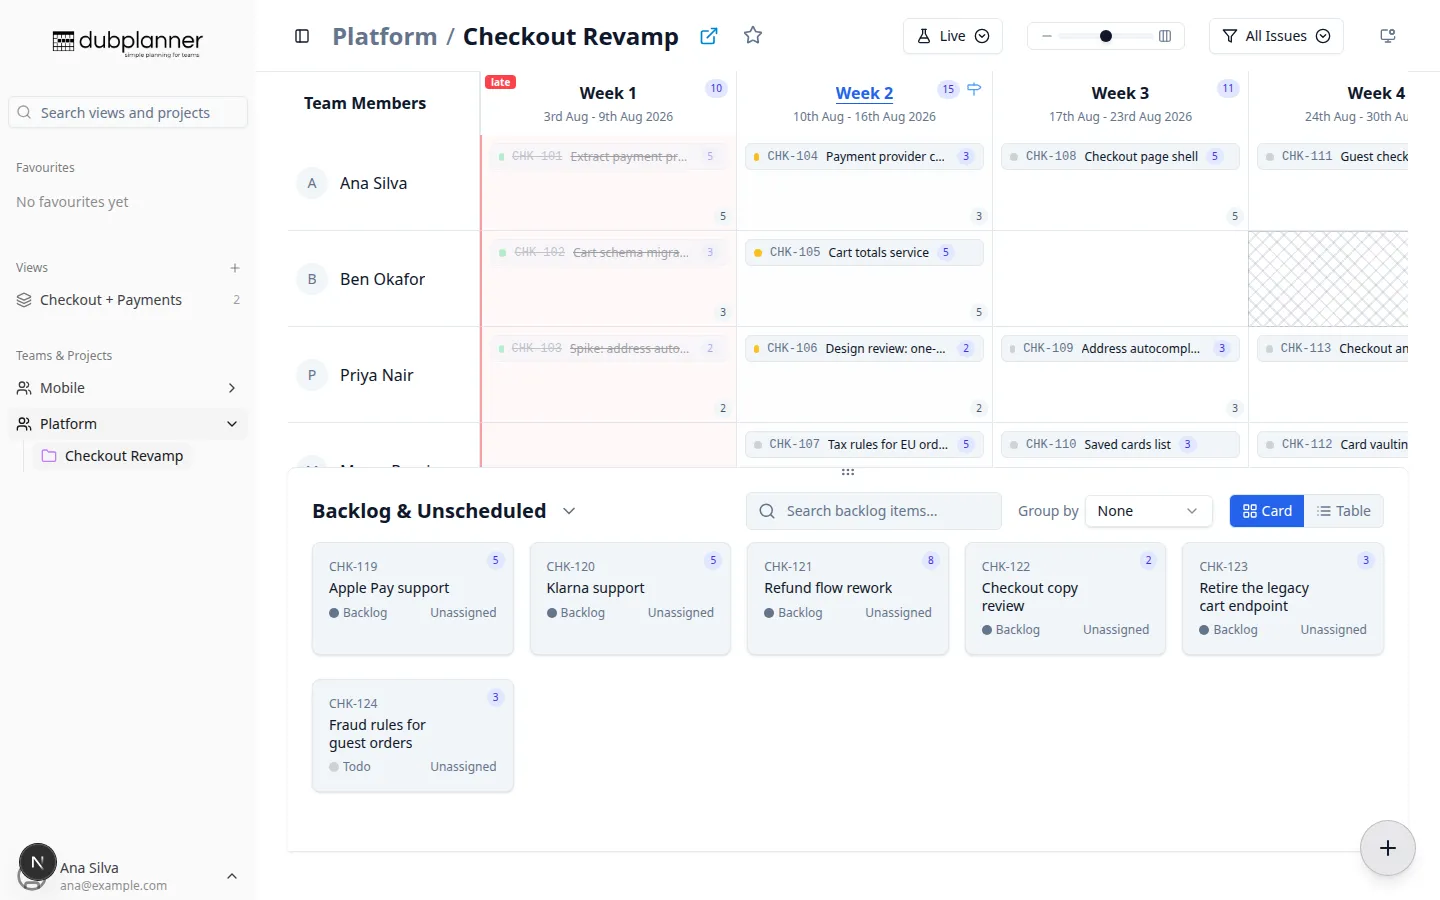
The grid is the whole product in one screen: people down the side, weeks across the top, and every issue in the cell where someone is expected to work on it.
Reading the grid
Section titled “Reading the grid”Columns are weeks
Section titled “Columns are weeks”Week 1 is the week your project starts. Each header shows the week number and the calendar dates it covers, plus a count of the issues in that column. The current week is highlighted, and the board opens scrolled to it — in a single project and in a Custom View alike.
A week header can also show:
- A milestone marker — click it to focus that milestone
- A total estimate for the column, when your team estimates numerically and estimates are switched on
- A
lateflag on weeks that have already passed but still hold unfinished work — the unfinished tickets in them are marked too
Rows are people
Section titled “Rows are people”Rows come from the project’s members in Linear, plus an Unassigned row for work that has a week but nobody on it yet. Right-click a person’s name to manage their availability.
Where someone is on holiday or otherwise unavailable, their cells for those weeks are shaded, so you can see at a glance that a week is not really open.
Cells hold the work
Section titled “Cells hold the work”Each cell shows the issues for that person in that week, with a status dot, the issue identifier, the title and — if enabled — the estimate, plus a cell total. How much of that you see depends on display density: at the smallest setting a ticket is a coloured chip with an ID; at the largest it is a full card.
If a cell holds more than fits, use the arrows inside it — or turn on Expand Rows to make every row tall enough to show everything at once.
Moving around
Section titled “Moving around”| Gesture | What it does |
|---|---|
| Scroll | Move through weeks and rows normally |
| Hold Space and drag | Pan the board with the mouse — the cursor becomes a grab hand |
| Click a ticket | Open the ticket detail panel |
| Hover a ticket | Show a detail popup after about a second (can be turned off) |
| Right-click a ticket | Ticket menu — status, assignee, milestone, create, delete |
| Right-click a cell | Cell menu — create an issue, or book availability |
| Double-click a cell | Create an issue prefilled with that person and week |
| Press C | Create an issue |
Holding Space suppresses ticket dragging while you pan, so panning never accidentally moves work.
What is on a ticket card
Section titled “What is on a ticket card”- Status dot, coloured by your Linear workflow state’s type — so renaming a state in Linear does not change what you see here
- Identifier and title
- Estimate, as a number or a T-shirt size, matching how your team estimates
- A project dot in a Custom View, matching the project’s colour in the sidebar
- An amber outline in What-If mode, if this scenario changed the ticket
Completed work is drawn at reduced opacity so active work stands out, and can be hidden entirely with Show Completed.
Filtering what appears
Section titled “Filtering what appears”Two controls in the header decide which issues reach the board at all:
- Issue view filter — All Issues, Issues Only (no sub-issues), Sub-Issues Only, or Leaf Issues (issues with no children). Useful when a project is heavily broken down and the parents are just noise.
- Display options — Show Completed, Show Archived, Show Estimates, Expand Rows, Hover Details and dark mode. See Display options.
Both are remembered between visits.
Below the grid
Section titled “Below the grid”The Backlog & Unscheduled area holds everything with no week. It has its own search, card and table layouts, and grouping by milestone, status or project. See The backlog.
Related pages
Section titled “Related pages”- Scheduling work — dragging, creating and changing issues
- Ticket details — the side panel
- Display options — density and toggles
- Keyboard & mouse — the full list